Let’s talk about how to set up a full-stack serverless ReactJS application using AWS Amplify & AWS SES to send notification emails. We will also use the Amazon Lambda service for serverless building and Amazon DynamoDB for keeping user transactions.
What is Amazon Simple Email Service (SES)?
Amazon Simple Email Service (SES) is a scalable, cost-effective, and flexible scalable email service that enables developers to send mail from within any application.
Amazon SES with Lambda enables you to send and receive transactional emails using your email addresses and domains, while only paying for what you use. This service is used for sending both transactional and mass emails.
SES can be easily integrated within Amazon EC2, AWS Lambda, Amazon SNS, and several others. For example, if you wanted to:
- Receive an acknowledgment email upon the completion of your lambda function performing an execution
- Or trigger the execution of a lambda function by sending an email.
You can quickly configure Amazon SES to support several email use cases, including transactional, marketing, or mass email communications.
Amazon SES offers flexible IP deployment and email authentication options, which improve deliverability, protect sender reputation, and provide analytics to measure email impact. With Amazon SES, you can send emails securely, globally, and at any scale.
Some of the use cases where SES is used include:
- Transactional email for user-triggered actions such as account-related activity
- Email notifications to existing users such as alerts
- Marketing emails to targeted lists and newsletters
In this hands-on demonstration, we will detail how to
- Configure Amazon Simple Email Service — SES,
- Verify an email address with SES,
- Create a lambda function,
- And finally integrate Amazon SES with AWS Lambda automatically to send notification emails upon the completion of the function execution.
To learn more about what AWS Lambda is, please check our “The Complete Guide to Implement Social Login With AWS Amplify” blog post.
Benefits of SES
Amazon SES has several benefits including:
- High deliverability
- Configurability
- Reliability
- Cost-effectiveness
For most people, cost efficiency is the top priority. The cost of sending emails using SES depends on two things — the number of emails sent and the total size of the emails.
For example, if you were to send 100k emails with a total email size of 256 GB and an additional 100 GB of data as an attachment, the cost would be:
Cost of number of emails sent = (100000–62,000 free emails) × $0.0001 per email = $3.80
Cost for data = (256 GB + 100 GB) × $0.12 per GB of data = $42.72
Note: The data includes headers, message content (including text and images), and attachments.
Total cost for the above example = $46.52
Sample code to send mails using SES in Lambda
In the example below, Reactjs NextJs Framework, AWS Lambda function, AWS Amplify, AWS DaynamoDB, and Async API sendEmail of AWS SES are used to asynchronously send emails from a defined from and to addresses.
Getting Started
Once the setup is complete, clone the main branch from the GitHub URL.
After cloning the project, install the dependencies and run the project. You may find some helpful commands below:
git clone https://github.com/PBCLOUD/SES-notification-workshop.git
cd SES-notification-workshop
npm install
npm run dev
Once the project has started, you should be presented with the following screen by visiting localhost:3000.
Initializing Backend
Before creating the backend, make sure we`re in the root directory of the project.
From here, we’ll initialize Amplify by running the following command:
amplify init
After following the amplify init steps, the entire flow should look like the screenshot below:
Adding an API
Our application is ready to use the Amplify CLI, and we’ll now create our backend. We are using AWS AppSync, which is a managed GraphQL API.
Traditionally, when sending emails, a REST API is used. However, AppSync provides significantly more flexibility when it comes to handling authorization and a few other features.
To add an API in Amplify, type the following command in the project’s terminal:
amplify add api
Follow amplify api creation steps. The entire flow should look like the screenshot below:
By selecting these options through the prompts, we have indicated to Amplify how we would like our API to be built.
At this step, Amplify has opened up a file called schema.graphql. Replace everything in that file with the following:
type Candidate
  @model
  @auth(rules: [{ allow: public, operations: [create] }]) {
   id: ID!
   name: String!
   email: AWSEmail!
}
The @model text is called a directive. When Amplify sees this, it will automatically create a DynamoDB table and create CRUDL operations for the type it’s associated with (in this case, Candidate).
The @auth directive sets up authorization rules for our API. Here we specify that “Our API is public, but users can only create entries in our database. They are not authorized to read, update, or delete items.”
With this setup, our API and database are ready to be deployed. Now, let’s move on to our function.
Setting Up Lambda Function Trigger
AWS Lambda is an event-driven serverless function. We want this function to be triggered whenever an item is added to our dynamoDB database.
Fortunately, Amplify takes care of this process by allowing us to set this up from the CLI.
To add a function with the trigger in Amplify, type the following command in the project’s terminal:
amplify add function
Follow amplify lambda function creation steps. The entire flow should look like the screenshot below:
Let’s replace the content in our lambda function ( \SES-notification-workshop\amplify\backend\function…\src\index.js ), with the following:
const aws = require('aws-sdk')
const ses = new aws.SES()

exports.handler = async (event) => {
  for (const streamedItem of event.Records) {
    if (streamedItem.eventName === 'INSERT') {
      //pull off items from stream
      const candidateName = streamedItem.dynamodb.NewImage.name.S
      const candidateEmail = streamedItem.dynamodb.NewImage.email.S

      await ses
          .sendEmail({
            Destination: {
              ToAddresses: [process.env.SES_EMAIL],
            },
            Source: process.env.SES_EMAIL,
            Message: {
              Subject: { Data: 'Candidate Submission' },
              Body: {
                Text: { Data: `My name is ${candidateName}. You can reach me at ${candidateEmail}` },
              },
            },
          })
          .promise()
    }
  }
  return { status: 'done' }
}
The function will automatically trigger when a user fills the modal. The function then grabs the items from the modal and sends an email. Here, we trigger the sendEmail function from the AWS SES module. To send an email with AWS SES, our function needs to have permission to interact with SES. The next step is required to use Amazon SES Transactional Email with Lambda.
Setting Up SES
As described earlier, AWS SES is used to send an email. When first setting up SES, AWS will place you in sandbox mode which allows you to:
- Send/receive emails only from verified email addresses
- Send 1 email per second
- Send 200 emails per day
For more complex settings, you should go to the AWS SES console. Search for “SES” in the top search bar of the console and open the AWS SES console. This will give you a similar view to the one shown below:
After that, follow the following steps:
-
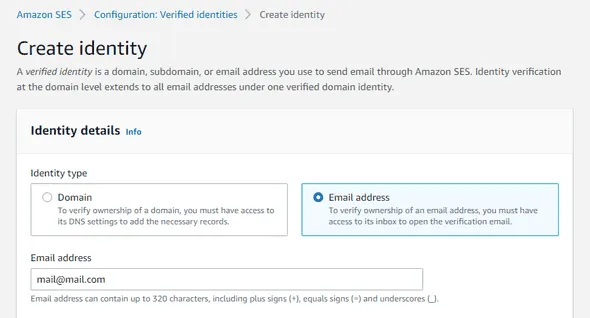
- Click the “Create identity” button in the top right-hand corner.
- Select the “Email address” option and enter your desired email
- Click the orange “Create identity” button.
- Follow the link in the confirmation email you received.
Congratulations! You verified your email address and gave permission to send Amazon SES Transactional Emails.
You can access the verified email list from the “Verified identities” section in the menu on the left.
Click on your email and keep that page open so you can copy the Amazon Resource Name (ARN) later.
Now we have AWS SES and a lambda function that use SES email service. We now need to give permission to our lambda function to access the AWS SES module.
Now, let’s update the permissions by following the steps below:
- In the project directory navigate to the following directory:
“amplify/backend/function/your-function-name/your-function-name-cloudformation-template.json”
- Open this file and search “lambdaexecutionpolicy”
- Add the following object to the Statement array and save.
{
 "Action": ["ses:SendEmail"],
 "Effect": "Allow",
 "Resource": "the-arn-you-copied-from-ses"
}
The next step is to add an environment variable called SES_EMAIL to our function:
- Open the terminal and run the following command:
amplify update function
Here we’ll describe the environment variable name and value. After following the amplify steps, your screen should look the same as below:
Push Backend
Finally, we can leave the job to Amplify. Open the terminal and write the code below:
amplify push
Amplify will provide a table of the resources we created, answer that with Yes.
It’ll take a few minutes to finish up and after that, our backend will be complete.
Now we have a frontend and backend setup. We can now run it and wait for the email notification.

Conclusion
Using Amplify simplifies setting up AWS services allowing users to focus on actual business logic.
We now have a full-stack serverless app that can send notifications on AWS Cloud. You can find the source code of this application on GitHub. If you have any questions or ideas, feel free to create a ticket and we’ll get back to you as soon as possible.
We hope you’ve enjoyed our how-to guide for email notifications with AWS SES. Check out our DevSecOps services to start your digital transformation today!