In the world of mobile devices, Android applications are ubiquitous and widely used for a variety of purposes. With the increasing amount of sensitive information stored in these applications, it’s more important than ever to ensure their security. This is where Android application pentesting comes in.
By testing the security of Android applications, security professionals can identify vulnerabilities and weaknesses that could be exploited by attackers. Today, we’ll explore the tools and methods used for Android application pentesting, including emulators, APK files, ADB, SSL pinning, and more.

Table of Contents
1. Emulators
2. APK (Android Package Kit)
3. How to Install MobSF Docker image in Kali
4. ADB (Android Debug Bridge)
4.1 How ADB Works?
4.2 ADB Shell Commands
5. Burp Certificate Installation on Emulator
6. What is SSL Pinning?
6.1 How to Implement SSL Pinning?
6.2 How to Detect SSL Pinning?
6.3 SSL Pinning Bypass
7. Conclusion
Emulators
Android emulators can be useful for pentesters as they provide a virtual environment for testing and analyzing Android apps for security vulnerabilities. Some Android emulators that are specifically designed for pentesting include. Genymotion, Android Studio, and Nox Player are popular Android emulators that are widely used by developers, testers, and users alike.
Here is some information about each of them:
- Genymotion: It is a powerful Android emulator that offers a fast and responsive virtual environment for testing and running Android apps. It supports a wide range of virtual devices, Android versions, and configurations, and includes advanced features such as GPS simulation, multi-touch gestures, and network latency emulation. Genymotion is available for Windows, macOS, and Linux platforms, and offers both free and paid versions with additional features.
- Android Studio: It is the official integrated development environment (IDE) for Android app development and includes a built-in Android emulator for testing and debugging apps. Android Studio emulator offers a wide range of Android versions, screen sizes, and hardware configurations for testing, and includes advanced features such as camera simulation, multi-touch input, and network latency emulation. Android Studio is available for Windows, macOS, and Linux platforms, and is free to download and use.
- Nox Player: It is a popular Android emulator that is primarily designed for gaming and offers a high-performance virtual environment for running Android games and apps on a computer. It supports a wide range of virtual devices, Android versions, and configurations, and includes features such as keyboard mapping, gamepad emulation, and multi-instance support. Nox Player is available for Windows and macOS platforms and is free to download and use.
Overall, all three Android emulators offer different features and capabilities for testing and running Android apps on a computer, and the choice depends on individual needs and requirements.
APK (Android Package Kit)
It is the file format that Android uses to distribute and install apps. An APK contains all the elements an app needs to install correctly on your device. We can open the APK file with WinRAR and see what’s inside.
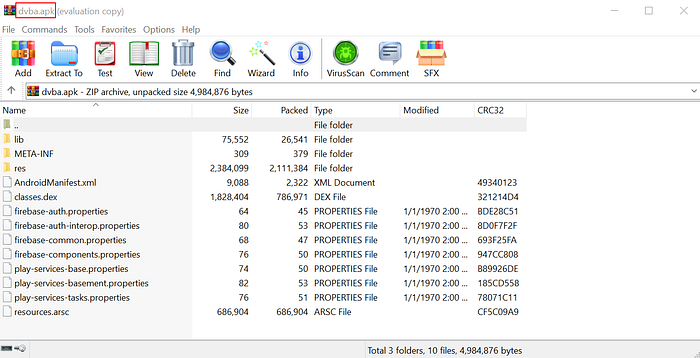
- META-INF/: Manifest file, signature, and sources.
- lib/: Native libraries that work on specific device architectures.
- res/: Uncompiled resources in Resources.asc.
- assets/: Raw source files that developers package with the application.
- AndroidManifest.xml: Describes the name, version, and content of the APK file. Includes application permissions.
- classes.dex: Compiled Java classes to run on the device.
How to Install MobSF Docker Image in Kali 🐳
MobSF (Mobile Security Framework) is an open-source tool for performing static analysis of mobile apps. It can analyze both Android and iOS apps and provides various features such as decompilation, malware detection, and vulnerability scanning. It aims to automate the process of mobile application security testing, making it easier for developers and security professionals to identify and fix vulnerabilities in their apps.
1️⃣Firstly, Docker needs to be installed in Kali. You can follow the instructions via the link below.
2️⃣After installing Docker, download the MobSF Docker image via the following command:
sudo docker pull opensecurity/mobile-security-framework-mobsf
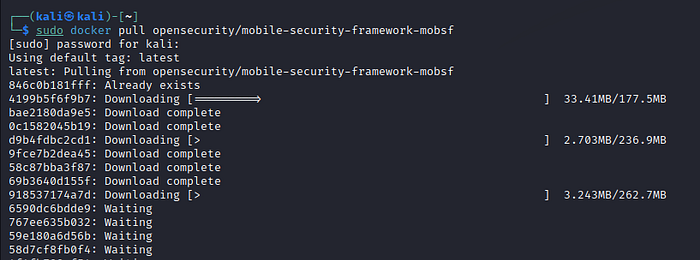
3️⃣Docker image is downloaded. Then, run the image with the following command:
sudo docker run -it -p 8000:8000 opensecurity/mobile-security-framework-mobsf
4️⃣After closing, you can follow the steps below to start again the same container easily:
- List all containers with the following command:
sudo docker ps -a

- The container id of the MobSF image is learned. Then, start this container with the following command:
sudo docker start <container id>

- When started, the message “Listening at: http://0.0.0.0:8000” would appear. This represents the website address where one can access MobSF.
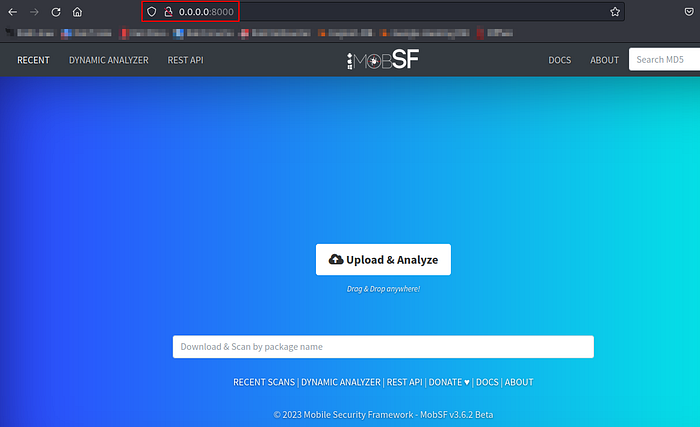
- We can stop the MobSF container when we are done with the following command:
sudo docker stop <container id>

ADB (Android Debug Bridge) 🌉
Android Debug Bridge (adb) is a versatile command line tool that lets you communicate with an emulator instance or connected Android-powered device.
It is a client-server program with three components:
- The client runs on our own machine. You can invoke a client by issuing an adb command from a command line terminal.
- Daemon, a daemon (adbd) that executes commands on a device. The daemon runs as a background process on each device.
- The server manages the communication between the client and the daemon. The server runs as a background process on your machine.
How ADB Works?
When you start an adb client, the client first checks if there is an adb server process currently running. If not, it starts the server process. When the server starts, it connects to local TCP port 5037 and listens for commands sent from adb clients.
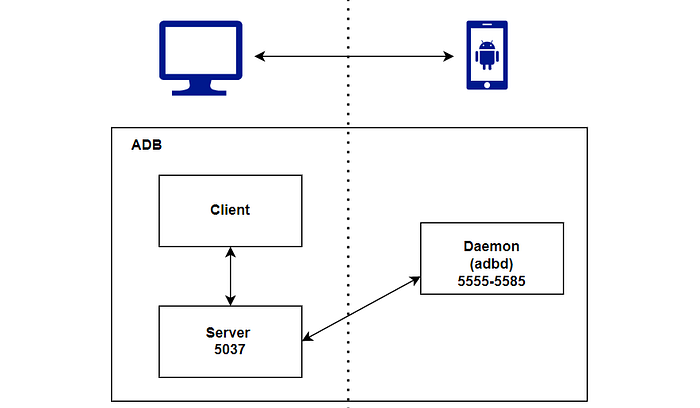
The server then establishes connections with each emulator/device instance that is active. By scanning odd-numbered ports in the range of 5555 to 5585, which is the range utilized by emulators and devices, it can find instances of these objects. The server establishes a connection to the port where it discovers an adb daemon. A pair of consecutive ports are acquired by each emulator/device instance, one for console connections and the other for adb connections.
For instance:
Emulator 1, console: 5554
Emulator 1, adb: 5555
Emulator 2, console: 5556
Emulator 2, adb: 5557
and so on…
As can be seen, the emulator instance that is connected with adb on port 5555 and the instance whose console listens on port 5554 are the same.
This article may interest you: Broken Access Control vs Broken Authentication
ADB Shell Commands 💻
#lists all the commands we can use on adb.
adb
#lists the emulators currently active on the computer.
adb devices
#lists all application packages.
adb shell pm list packages
#extract the apk file from the emulator to the computer
##find target application
adb shell pm list packages | grep exampleApp
##get the full path name of the APK file for the desired package
adb shell pm path com.exampleApp
##get apk to the computer
adb pull /data/app/com.exampleApp/base.apk /<target directory on computer>
#install the apk on emulator
adb install example.apk
#connect&run commands on multiple emulator
adb -s IP:PORT <command>
Burp Certificate Installation on Emulator
Note: After API level 24 (Android 7.0 — “Nougat”) Android devices, Android changed the default behavior of trusting user-installed certificates. It’s no longer possible to just install the Burp CA from the SD card to start intercepting app traffic. Unless otherwise specified, apps will now only trust system-level CAs.
Installation Steps:
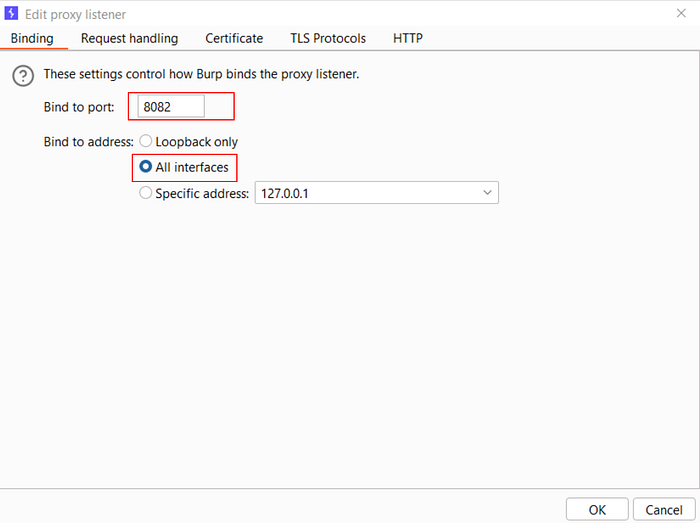
1️⃣Configuring the Burp Proxy listener
- Open Burp Suite Professional and click Settings to open the Settings dialog.
- Go to Tools > Proxy.
- In Proxy Listeners, click Add.
- In the Binding tab, set Bind to port 8082 (or another port that is not in use).
- Select All Interfaces and click OK.
2️⃣ Configuring the device to use the proxy
- In your Android device, go to Settings > Network & Internet.
- Select Internet and long-press the name of your Wi-Fi network.
- Select Modify.
- From the Advanced options menu, select Proxy > Manual.
- Set the Proxy hostname to the IP of the computer running Burp Suite Professional.
- Set the Proxy port to the port value that you configured for the Burp Proxy listener, in this example
8082. - Touch Save.
3️⃣ Install a CA certificate on your Android device
- Open Burp Suite. Then, Burp -> Proxy -> Options -> Export CA certificate -> Certificate in DER format.
- Use OpenSSL to convert DER to PEM.
openssl x509 -inform DER -in cacert.der -out cacert.pem
- Get the certificate hash and rename it to certificate as <cert-hash>.0
openssl x509 -inform PEM -subject_hash_old -in cacert.pem | head -1
9a5b575
mv cacert.pem 9a5b575.0
- Move the created certificate in the emulator using adb
#Change /system partition into writable mode with remount
adb remount
#Transfer certificate
adb push 9a5ba575.0 /system/etc/security/cacerts/
#Change its permissions
adb shell chmod 644 /system/etc/security/cacerts/9a5ba575.0
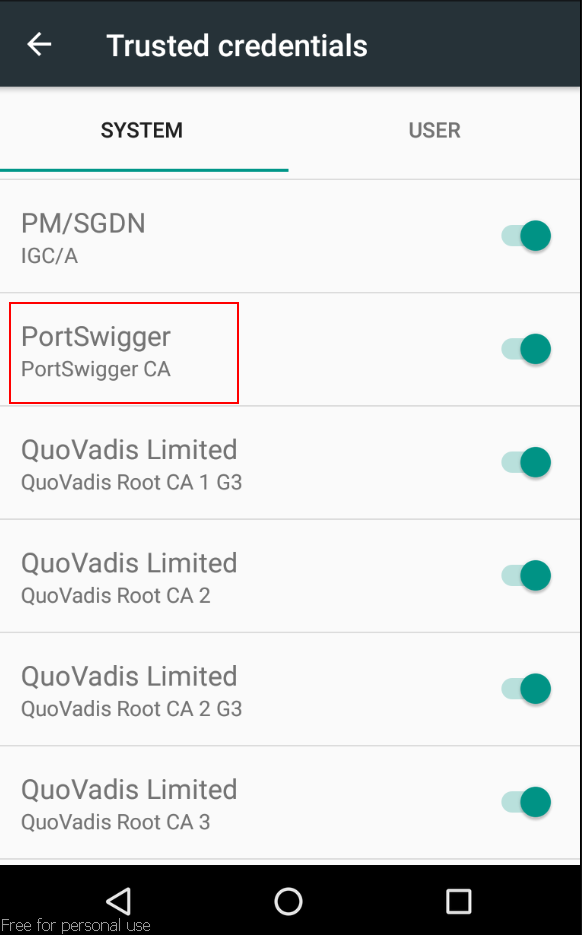
- Navigate to Settings -> Security & Location -> Encryption & Credentials -> Trusted Credentials. Confirm that the certificate should now be installed as a system-trusted CA certificate.
4️⃣ Testing configuration
- Open Burp Suite Professional.
- Go to Proxy > Intercept and click Intercept is off to switch Intercept on.
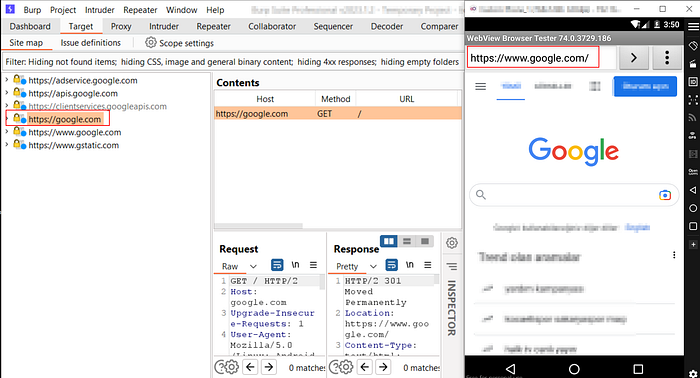
- Open the browser on your Android device and go to an HTTPS web page.
What is SSL Pinning?
The technique of SSL certificate pinning is intended to thwart sophisticated and hazardous security attacks. This security mechanism involves associating the identity of reliable certificates with mobile apps and restricting access to any unknown documents from suspicious servers.
Adding an HTTPS scheme to all URLs within the application does not imply SSL anchoring. Adding Burp’s root CA certificate to the device does not always bypass SSL pinning. The reason for this confusion is that bypassing SSL pinning involves two steps.
- The first is to add a mobile device-specific CA certificate (like Burp CA).
- Second, bypassing the certificate pinning logic by making the application trust the CA certificate added in the first step.
Applications without any SSL pinning checks will run fine right after the first step. For those with SSL pinning, they will only work after the second step is successful.
How to Implement SSL Pinning?
SSL pinning can be implemented in mobile apps by following these general steps:
- Identify the specific server(s) that your app communicates with, and obtain the server’s SSL certificate.
- Extract the public key from the SSL certificate and include it in your mobile app’s code.
- Modify your app’s network layer to check that the SSL certificate presented by the server matches the public key stored in your app’s code. If there is a match, the connection is allowed. If not, the connection is rejected.
There are different methods to implement SSL pinning, and the specific steps may vary depending on the platform and development environment. There are also some tools and libraries that can facilitate the process of SSL pinning implementation, such as TrustKit and OkHttp.
It’s important to note that SSL pinning should be used in conjunction with other security measures, as it is not a silver bullet and can be bypassed by determined attackers.
How to Detect SSL Pinning?
Static Analysis
- Android 7.0 (API 24) and above allow adding certificate pinning to the network security configuration file. It can be checked whether pinning is done in the NetworkSecurity.xml file.
- It can be detected by searching for keywords such as pin digest, and pin-set in the source code using the MobSF tool.

Dynamic Analysis
- It can be detected by examining Logcat logs.
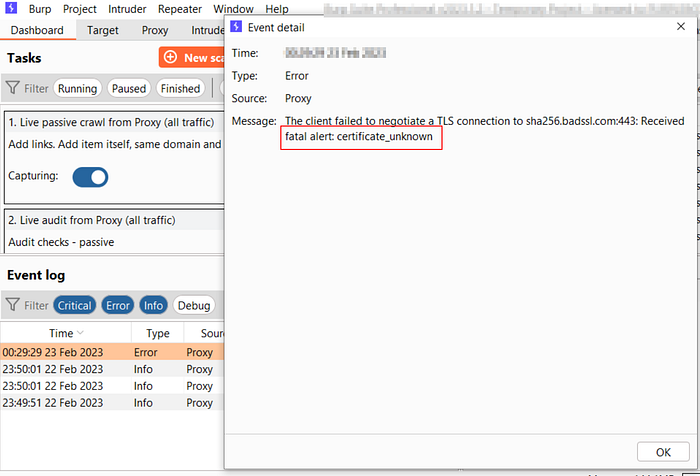
- It can be detected by checking Burp logs. (certificate_unknown error)
SSL Pinning Bypass
After detecting that an application has SSL pinning, the next step is to bypass it. The effort to circumvent SSL pinning differs in each application.
Simple to mixed bypass methods:
- Installing the application on a lower version Android device: Let’s say the Android app uses SSL pinning validation running on a specific Android version. In this case, installing the app on a lower Android version may help bypass the protection.
- By making changes to the Network Security Config file: If the application only uses the Network Security Config file for SSL pinning logic, removing the “pin digest” and recompiling the apk may bypass SSL pinning.
- Xposed Modules: Xposed is a framework for modules that can change the behavior of the system and apps without touching any APK. Since all changes are made in memory, simply disable the module and reboot to get your original system back. SSL pinning can be bypassed using JustTrustMe and various other modules.
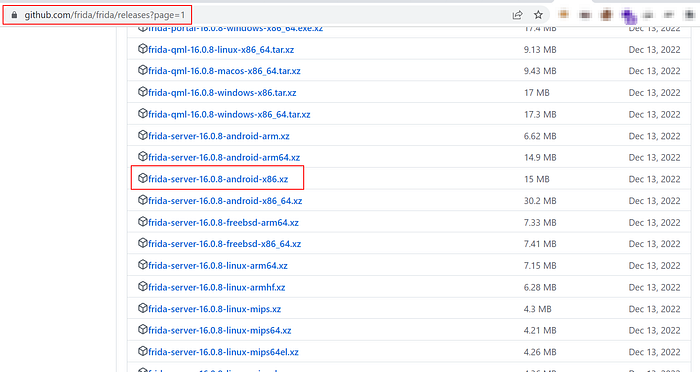
- Frida: Emulator CPU architecture and local Frida version should be compatible with the Frida-server that we will upload via GitHub. Local Frida version:

The Frida-server to be downloaded from GitHub should look like the visual below:
The CPU architecture of the emulator is checked:
adb shell
getprop ro.product.cpu.abi

We add the Frida file to the emulator to set up our server, where we will send our commands from local:
adb push Downloads\frida-server-16.0.8-android-x86\frida-server-16.0.8-android-x86 /data/local/tmp/frida-server
We export the certificate with the extension der from Burp. In order to install the certificate on the Android device, we make the extension .crt and upload it to the emulator.
adb push \cacert.der /data/local/tmp/cert-der.crt
We start Frida Server on the emulator:
adb shell
cd /data/local/tmp
chmod 755 frida-server
./frida-server
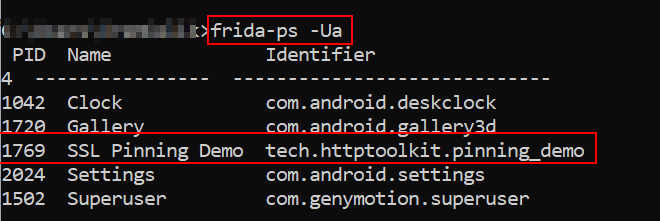
For the application name in the terminal, we look at the processes that work with Frida:
frida-ps -Ua
We start the Frida application on our device for the application to be pinning bypass using the Frida script:
frida -U -f tech.httptoolkit.pinning_demo -l \fridaScript.js
Conclusion
Mobile app pentesting is a crucial process that helps identify and address vulnerabilities in Android applications. With the help of various tools and techniques, pentesters can detect and mitigate security risks for mobile applications. However, the mobile app landscape is constantly evolving, and staying up-to-date with the latest security trends and challenges is essential to ensure that mobile apps can withstand the attacks of determined adversaries.
Overall, the goal of any pentest is to improve the security and resilience of mobile applications, and our Penetration Testing services can help you achieve that goal. Thank you for reading this blog post, and we hope you found it informative. Be sure to check out our blog section for more information on this topic and other security-related issues.
